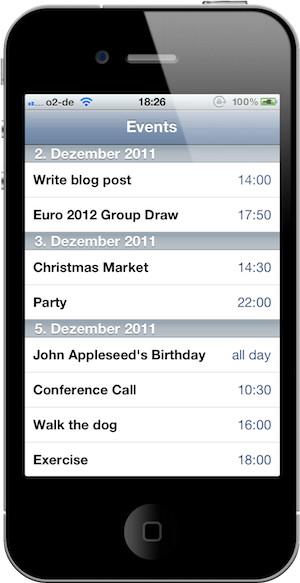
Let me follow up on last month’s little series about date and time handling in Cocoa with a practical example.
Say you want to implement a list of your future appointments similar to the List view in Apple’s Calendar app on the iPhone. Calendar events should be listed in a table view, with each day getting its own section. So we have to group the dates by day, which is an interesting task to get familiar with the date handling classes.
Project Setup
I am not going to cover the basics here. We need a fresh Xcode project (the navigation-based app template is a good start) with a view controller that displays a UITableView. Since we are going to work with the calendar store on the device, we also need to link our app with the EventKit.framework and import the framework’s header file: #import <EventKit/EventKit.h>.
Getting Events from the Calendar Store
The first thing we have to do is get a list of future events from the calendar store. Our interface to the store is the EKEventStore class. The event store lets us generate a predicate that we can then use to retrieve all events matching the predicate. All we need to do is specify a start and end date for the predicate.
Constructing Start and End Date
Say we want to list all events between today and one year from today. A natural start date for our query would be [NSDate date], which gives us the current date and time. But what about appointments that were scheduled for earlier today? I think we should include them in our list even though they lie in the past. It’s better than to confuse the user by showing only part of today’s events.
So our start date should be the beginning of the current day. How do we determine that date, given that all we have is the current date and time? Think about it this way: we want a date that represents a specific time (00:00) on a given day. The easiest way to do that is to selectively convert the date components of the given date into an NSDateComponents instance, then set the specific time components manually, and convert the whole thing back into an NSDate:
- (NSDate *)dateAtBeginningOfDayForDate:(NSDate *)inputDate
{
    // Use the user's current calendar and time zone
    NSCalendar *calendar = [NSCalendar currentCalendar];
    NSTimeZone *timeZone = [NSTimeZone systemTimeZone];
    [calendar setTimeZone:timeZone];

    // Selectively convert the date components (year, month, day) of the input date
    NSDateComponents *dateComps = [calendar components:NSYearCalendarUnit | NSMonthCalendarUnit | NSDayCalendarUnit fromDate:inputDate];

    // Set the time components manually
    [dateComps setHour:0];
    [dateComps setMinute:0];
    [dateComps setSecond:0];

    // Convert back
    NSDate *beginningOfDay = [calendar dateFromComponents:dateComps];
    return beginningOfDay;
}
This method gives us an NSDate representing midnight in the current user’s local time for the specified input date.
For the end date, we want to add exactly one year to the start date. The trivial way to do that would be to add 365 * 24 * 60 * 60 seconds1 to the start date but this naive approach takes neither leap year nor different calendars into account. The better way is again the one via NSCalendar and NSDateComponents:
- (NSDate *)dateByAddingYears:(NSInteger)numberOfYears toDate:(NSDate *)inputDate
{
    // Use the user's current calendar
    NSCalendar *calendar = [NSCalendar currentCalendar];

    NSDateComponents *dateComps = [[NSDateComponents alloc] init];
    [dateComps setYear:numberOfYears];

    NSDate *newDate = [calendar dateByAddingComponents:dateComps toDate:inputDate options:0];
    return newDate;
}
The dateByAddingComponents:toDate:options: method is just great. It adds the specified date components to the input date and takes care of everything for us, including leap years and overflows from one unit to the next. For instance, if you were to add 5 months to a date in November, the method is smart enough to return a result in April of next year.
Querying the Calendar Store
Having start and end date, we can construct our search predicate. Add the following code to your view controller’s viewDidLoad method:
- (void)viewDidLoad
{
    [super viewDidLoad];

    NSDate *now = [NSDate date];
    NSDate *startDate = [self dateAtBeginningOfDayForDate:now];
    NSDate *endDate = [self dateByAddingYears:1 toDate:startDate];

    EKEventStore *eventStore = [[EKEventStore alloc] init];
    NSPredicate *searchPredicate = [eventStore predicateForEventsWithStartDate:startDate endDate:endDate calendars:nil];
    NSArray *events = [eventStore eventsMatchingPredicate:searchPredicate];
}
This gives us a list of events inside our desired timeframe.
Grouping Events by Day
Next, we have to group the list of events into sections, each section representing a single day. The way we approach this task is this:
- Iterate over all events.
- Reduce the event’s start date to its date components, i.e. strip off the time (like we did above to determine the start date of our search predicate).
- Use the reduced date as key in a
sectionsdictionary. - Each value in the
sectionsdictionary should be an array containing the events that belong to the day represented by the corresponding key. - Create a separate array in which we sort the keys of the
sectionsdictionary. We need this to display the sections in the correct order.
Make sense? Here is the code:
@property (strong, nonatomic) NSMutableDictionary *sections;
@property (strong, nonatomic) NSArray *sortedDays;

...

@synthesize sections;
@synthesize sortedDays;

...

- (void)viewDidLoad
{
    ...

    self.sections = [NSMutableDictionary dictionary];
    for (EKEvent *event in events)
    {
        // Reduce event start date to date components (year, month, day)
        NSDate *dateRepresentingThisDay = [self dateAtBeginningOfDayForDate:event.startDate];

        // If we don't yet have an array to hold the events for this day, create one
        NSMutableArray *eventsOnThisDay = [self.sections objectForKey:dateRepresentingThisDay];
        if (eventsOnThisDay == nil) {
            eventsOnThisDay = [NSMutableArray array];

            // Use the reduced date as dictionary key to later retrieve the event list this day
            [self.sections setObject:eventsOnThisDay forKey:dateRepresentingThisDay];
        }

        // Add the event to the list for this day
        [eventsOnThisDay addObject:event];
    }

    // Create a sorted list of days
    NSArray *unsortedDays = [self.sections allKeys];
    self.sortedDays = [unsortedDays sortedArrayUsingSelector:@selector(compare:)];
}
(The method is getting pretty long here. In practice, I wouldn’t place all this code in viewDidLoad but it should suffice for the example.)
Creating Date Formatters for Output
That’s it! The last thing we need are two NSDateFormatter objects to format the output for the section headers and cells in the table view. We could create those directly in the methods where we need them, but since creating a date formatter is a relatively expensive operation, we are better off creating them once and reusing them. Note that we don’t use specific date and time formats but instead rely on the predefined date formatter styles, which take the user’s preferences into account:
@property (strong, nonatomic) NSDateFormatter *sectionDateFormatter;
@property (strong, nonatomic) NSDateFormatter *cellDateFormatter;

...

@synthesize sectionDateFormatter;
@synthesize cellDateFormatter;

...

- (void)viewDidLoad
{
    ...

    self.sectionDateFormatter = [[NSDateFormatter alloc] init];
    [self.sectionDateFormatter setDateStyle:NSDateFormatterLongStyle];
    [self.sectionDateFormatter setTimeStyle:NSDateFormatterNoStyle];

    self.cellDateFormatter = [[NSDateFormatter alloc] init];
    [self.cellDateFormatter setDateStyle:NSDateFormatterNoStyle];
    [self.cellDateFormatter setTimeStyle:NSDateFormatterShortStyle];
}
Populating the Table View
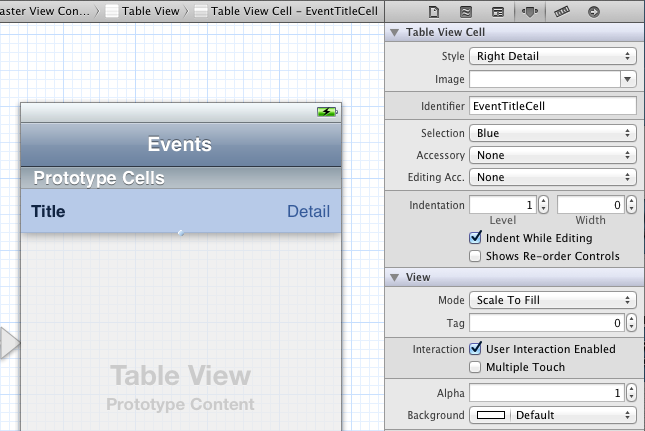
With the groundwork done, populating the table view is simple. Note that I am using iOS 5 for the sample project so we can configure our prototype table cell directly in Interface Builder:
The UITableViewDataSource protocol methods we have to implement are straightforward:
- (NSInteger)numberOfSectionsInTableView:(UITableView *)tableView
{
    return [self.sections count];
}

- (NSInteger)tableView:(UITableView *)tableView numberOfRowsInSection:(NSInteger)section
{
    NSDate *dateRepresentingThisDay = [self.sortedDays objectAtIndex:section];
    NSArray *eventsOnThisDay = [self.sections objectForKey:dateRepresentingThisDay];
    return [eventsOnThisDay count];
}

- (NSString *)tableView:(UITableView *)tableView titleForHeaderInSection:(NSInteger)section
{
    NSDate *dateRepresentingThisDay = [self.sortedDays objectAtIndex:section];
    return [self.sectionDateFormatter stringFromDate:dateRepresentingThisDay];
}

- (UITableViewCell *)tableView:(UITableView *)tableView cellForRowAtIndexPath:(NSIndexPath *)indexPath
{
    NSString *reuseIdentifier = @"EventTitleCell";
    UITableViewCell *cell = [tableView dequeueReusableCellWithIdentifier:reuseIdentifier];

    NSDate *dateRepresentingThisDay = [self.sortedDays objectAtIndex:indexPath.section];
    NSArray *eventsOnThisDay = [self.sections objectForKey:dateRepresentingThisDay];
    EKEvent *event = [eventsOnThisDay objectAtIndex:indexPath.row];

    cell.textLabel.text = event.title;
    if (event.allDay) {
      cell.detailTextLabel.text = @"all day";
    } else {
      cell.detailTextLabel.text = [self.cellDateFormatter stringFromDate:event.startDate];
    }
    return cell;
}
Download the Sample Project
In this tutorial about date handling, I illustrated how to combine Cocoa’s date handling classes, NSDate, NSCalendar, NSDateComponents, NSDateFormatter, to do date calculations, to derive new dates from existing ones, to group dates according to your own criteria, and to format dates for output on screen. And incidentally, we also learned to query the device’s calendar store.
I uploaded the small sample app to GitHub, please download it from there. Update December 21, 2011: I mistakenly had not included the .xcodeproj file in the repository. This mistake is now fixed, sorry for the confusion. Note that you won’t see anything but an empty table view when you run the app in the iOS Simulator since the simulator does not have a calendar store.
-
The number of seconds in a normal (non-leap) year. The result is 31,536,000 seconds. ↩︎

