One of the coolest new features in Xcode 4 is the ability to generate code for Interface Builder outlets and actions using drag and drop. What involved up to five separate manual code changes before can now be done with one drag and drop operation. Let’s see how it works in practice.
Video: Creating Outlets and Actions via Drag and Drop
I recorded a short video to demonstrate the process (no sound):
Step by Step Guide
-
Open the .xib file that contains the view or control for which you want to create a new outlet or action.
-
Open the corresponding header file. You can either use Xcode’s Assistant Editor (Option + Command + Return) to display the .xib and .h files side by side or open the .h file in a separate window.
-
Pick the control in your user interface for which you want to create an outlet or action method. Hold down the Control key and drag (or right-click-and-drag) from the control in question over into your class
@interface. Let the mouse button go when Xcode indicates a successful drag with a horizontal line.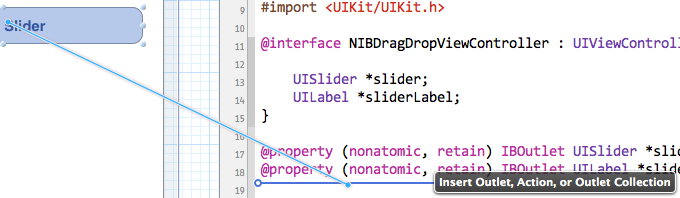
-
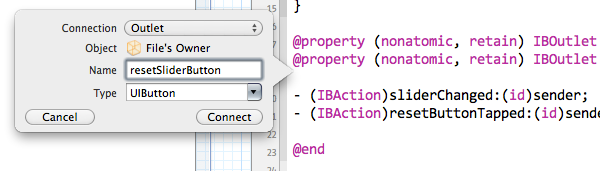
In the window that pops up, choose whether you want to create an outlet or an action. Give it a name and optionally modify the other parameters. Click Connect when you’re finished.
-
If you chose to create an outlet, Xcode will declare a
@propertyand a corresponding instance variable in your class’s interface.1 If you check the implementation file, you will see that Xcode added not only the necessary@synthesizestatement but also releases the ivar in your class’s-deallocmethod. If the class is aUIViewController, Xcode is even smart enough to know about the memory management requirements and sets the outlet tonilin the controller’s-viewDidUnloadmethod.Feel free to manually remove the ivar from your
@interfaceas it is no longer required. The compiler can now generate an ivar for any synthesized property automatically. -
If you chose to create an action, Xcode will declare a
-(IBAction)myAction:(id)sender;method in your class’s interface and insert an empty method body at the bottom of your class’s@implementationsection.
Caveats
As easy as it is to create the connections, as cumbersome is it to undo them. If you recognize immediately after clicking the Connect button that you made a mistake, the Undo command can help. Undo works on a per-file basis in Xcode, so make sure to undo the changes in all three locations: the .h and .m files and the .xib file.
If you want to remove a connection at a later time, you have to delete the generated code manually. Do not forget to also remove the connection in the .xib file or your app will crash: control-click the control in question and click the x in front of the outlet or action that you want to delete.
-
I have not yet identified the system behind Xcode’s naming strategy for the instance variable. It seems that by default the ivar’s name is identical to the name of the property. If, however, there is an existing property whose corresponding ivar starts with an underscore, Xcode sometimes seems to pick up this popular naming scheme and henceforth generates ivars with leading underscores in this file (connecting them to their property via the
@synthesize xyz = _xyz;statement). I have not been able to make this work reliably, though. ↩︎