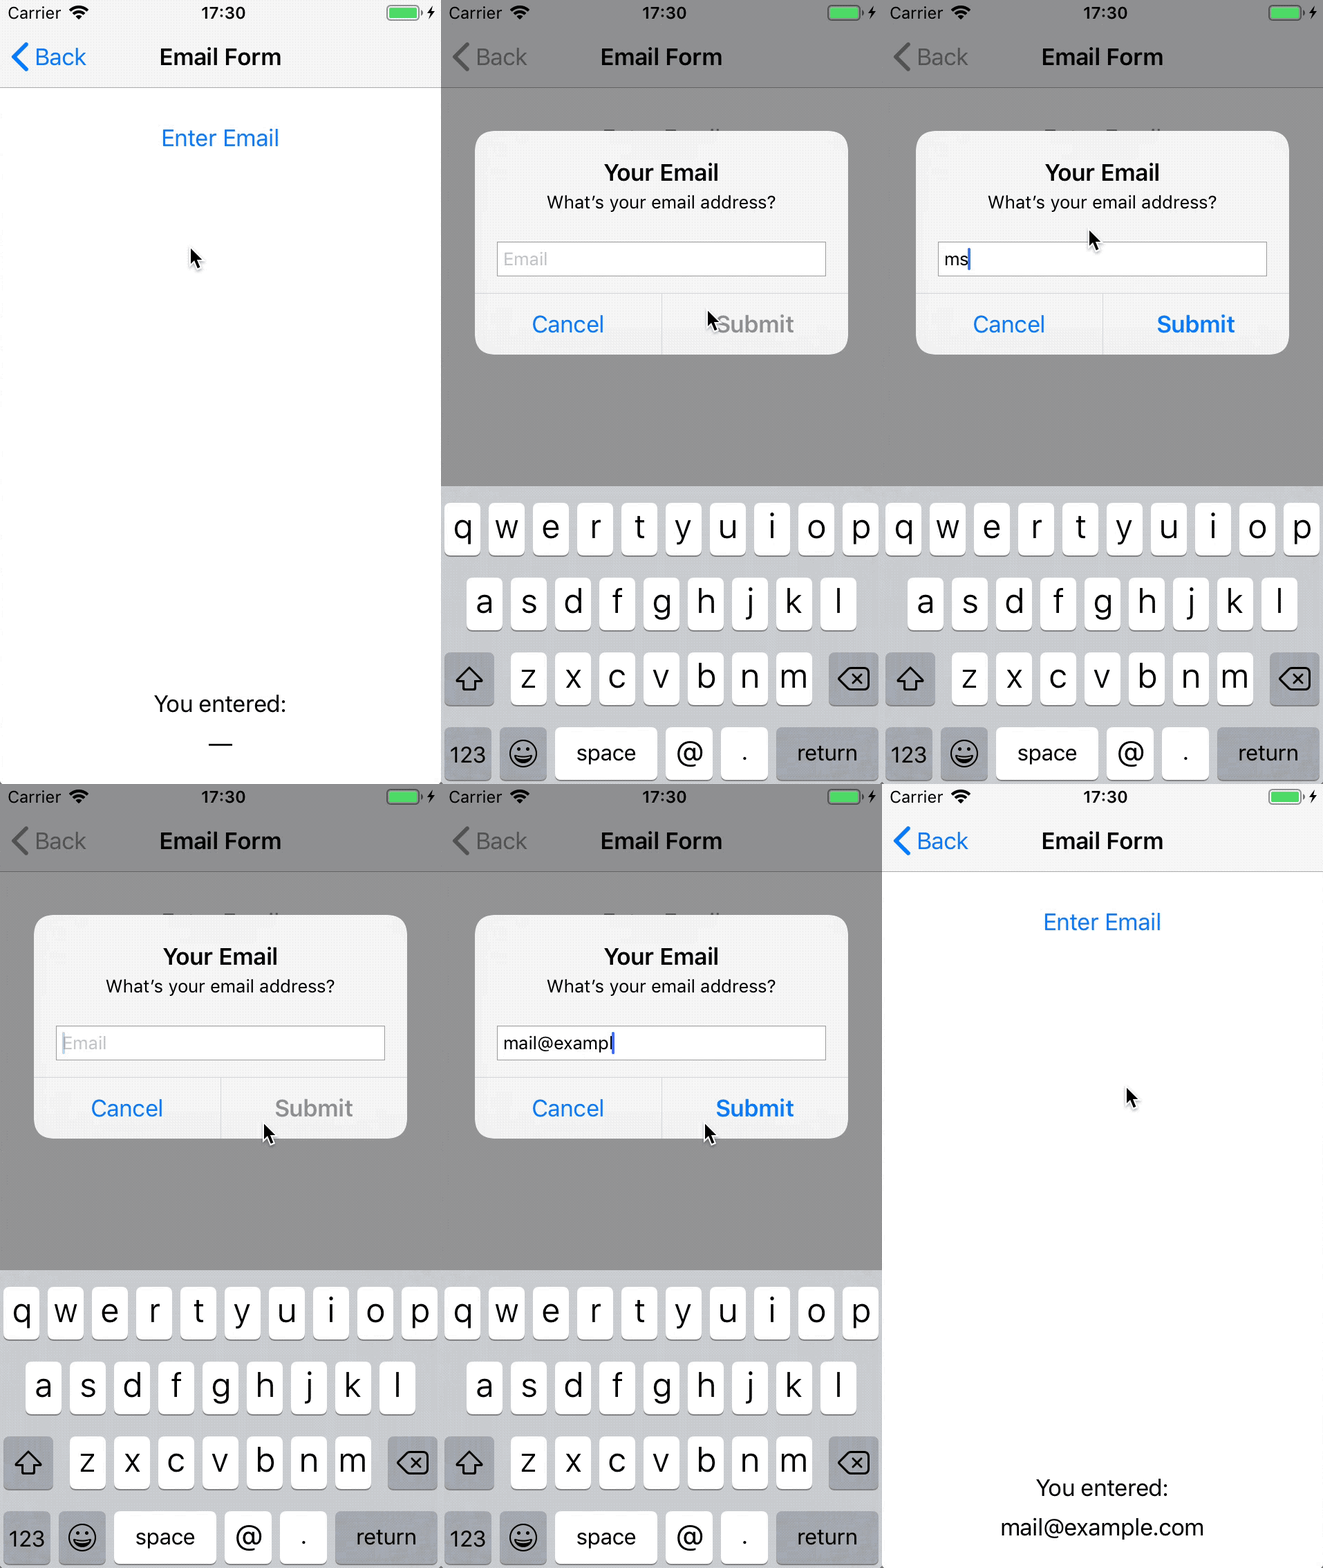
I wrote a handy little snippet for creating a UIAlertController with a single text field to request an input from the user. Its main feature, beside a slightly nicer API: you can pass in a validation rule that continuously checks if the input is valid as the user enters text. The OK button will only be enabled once the input passes validation.
Here’s a demo that uses the .nonEmpty validation rule, i.e. the input must not be blank:
And here’s the code that creates this alert:
let alert = UIAlertController(
    title: "Your Email",
    message: "What’s your email address?",
    cancelButtonTitle: "Cancel",
    okButtonTitle: "Submit",
    validate: .nonEmpty,
    textFieldConfiguration: { $0.placeholder = "Email" },
    onCompletion: { result in
        switch result {
        case .cancel: print("cancelled")
        case .ok(let text): print("result: \(text)")
    })
self.present(alert, animated: true)
The API
The public interface is a UIAlertController initializer with the following signature:
extension UIAlertController {
    public convenience init(title: String,
        message: String? = nil,
        cancelButtonTitle: String,
        okButtonTitle: String,
        validate validationRule: TextValidationRule = .noRestriction,
        textFieldConfiguration: ((UITextField) -> Void)? = nil,
        onCompletion: @escaping (TextInputResult) -> Void)
    {
        ...
    }
}
The initializer takes seven arguments. The first four are the usual strings for title, message, and button labels. The others need some explanation:
-
validationRuleDescribes what inputs to accept. There are four kinds of validation rules: (1) there are no restrictions, i.e. any input is valid, including the empty string; (2) the input must be non-empty; (3) you can specify a regular expression the input string must match; or (4) you can pass in a predicate function that determines if the input is valid. Here’s the definition of the enum that describes these options:public enum TextValidationRule { case noRestriction case nonEmpty case regularExpression(NSRegularExpression) case predicate((String) -> Bool) public func isValid(_ input: String) -> Bool { // returns true if the input string passes validation } }You could use this to validate email addresses, using a regular expression:
let emailRegex = try! NSRegularExpression(pattern: ".+@.+\\..+")
let emailRule = TextValidationRule.regularExpression(emailRegex)
emailRule.isValid("alice@example.com") // → true
emailRule.isValid("bob@gmail") // → false
Or to only accept numbers, using a predicate:
let integerRule = TextValidationRule.predicate({ Int($0) != nil }) integerRule.isValid("-789") // → true integerRule.isValid("123a") // → false -
textFieldConfigurationAn optional function you can pass in to configure the text field. Use this to set a placeholder text, configure the keyboard type, etc. -
onCompletionThe callback that’s invoked when the user dismisses the alert by tapping a button. The reported result is either.cancel(for the Cancel button) or.ok(String), where the associated value is the text the user entered. I defined this enum for the return value:public enum TextInputResult { case cancel case ok(String) }
The code
The full code is available as a Gist. It’s quite long (more than 100 lines, including doc comments), so let’s take it apart step by step.
After calling super, we first define an internal helper class to act as the text field’s delegate and target-action target. It’s definitely strange to define a helper class inside an initializer, but it allows us to keep everything nicely encapsulated. We also declare a local variable for storing an instance of the text field observer:
public convenience init(...)
{
    self.init(title: title, message: message, preferredStyle: .alert)

    /// Observes a UITextField for various events and reports them via callbacks.
    /// Sets itself as the text field's delegate and target-action target.
    class TextFieldObserver: NSObject, UITextFieldDelegate {
        let textFieldValueChanged: (UITextField) -> Void
        let textFieldShouldReturn: (UITextField) -> Bool

        init(textField: UITextField,
            valueChanged: @escaping (UITextField) -> Void,
            shouldReturn: @escaping (UITextField) -> Bool)
        {
            self.textFieldValueChanged = valueChanged
            self.textFieldShouldReturn = shouldReturn
            super.init()
            textField.delegate = self
            textField.addTarget(self,
                action: #selector(TextFieldObserver.textFieldValueChanged(sender:)),
                for: .editingChanged)
        }

        @objc func textFieldValueChanged(sender: UITextField) {
            textFieldValueChanged(sender)
        }

        // MARK: UITextFieldDelegate
        func textFieldShouldReturn(_ textField: UITextField) -> Bool {
            return textFieldShouldReturn(textField)
        }
    }

    var textFieldObserver: TextFieldObserver?
In my first implementation of this, I did not require a helper class; a plain notification observer was sufficient for running the validation and updating the OK button state every time the input changed. This made the code shorter, but then I discovered a bug: the user could still dismiss the alert while the OK button was disabled by pressing the Return key on the keyboard. To intercept the Return key, we need an observer object that can set itself as the text field’s delegate, and for that we need to write a custom type that conforms to UITextFieldDelegate.
Next we define a local finish function that serves as the funnel point for calling the completion handler when the alert gets dismissed:
    // Every `UIAlertAction` handler must eventually call this
    func finish(result: TextInputResult) {
        // Capture the observer to keep it alive while the alert is on screen
        textFieldObserver = nil
        onCompletion(result)
    }
In addition to calling the completion handler, the finish function has a very important task: it must capture the text field observer in order to keep it alive for the lifetime of the alert. I’ll talk more about this below. I could have used the standard library’s withExtendedLifetime function to make the lifetime choice explicit, but just referencing the variables works just as well.
With the declarations out of the way, we can start configuring the alert. This is pretty standard UIAlertController setup code. Note that the action handlers for the two buttons call our finish function:
    let cancelAction = UIAlertAction(title: cancelButtonTitle,
        style: .cancel,
        handler: { _ in
            finish(result: .cancel)
        })
    let okAction = UIAlertAction(title: okButtonTitle,
        style: .default,
        handler: { [unowned self] _ in
            finish(result: .ok(self.textFields?.first?.text ?? ""))
        })
    addAction(cancelAction)
    addAction(okAction)
    preferredAction = okAction
The final step is to configure the alert’s text field using the configuration function the client passed in, and to install the text field observer:
    addTextField(configurationHandler: { textField in
        textFieldConfiguration?(textField)
        textFieldObserver = TextFieldObserver(textField: textField,
            valueChanged: { textField in
                okAction.isEnabled = validationRule.isValid(textField.text ?? "")
            },
            shouldReturn: { textField in
                validationRule.isValid(textField.text ?? "")
            })
    })
    // Start with a disabled OK button if necessary
    okAction.isEnabled = validationRule.isValid(textFields?.first?.text ?? "")
}
And that’s it.
Keeping track of state by capturing it in a closure
What I like about this solution is that the entire behavior is contained in the initializer. There’s no extra object involved for storing the alert’s state. Clients just see the familiar UIAlertController interface, even though the extension has some additional state to manage: namely, the text field observer object.
The observer is being kept alive by capturing it in the finish function, turning the local function into a closure.
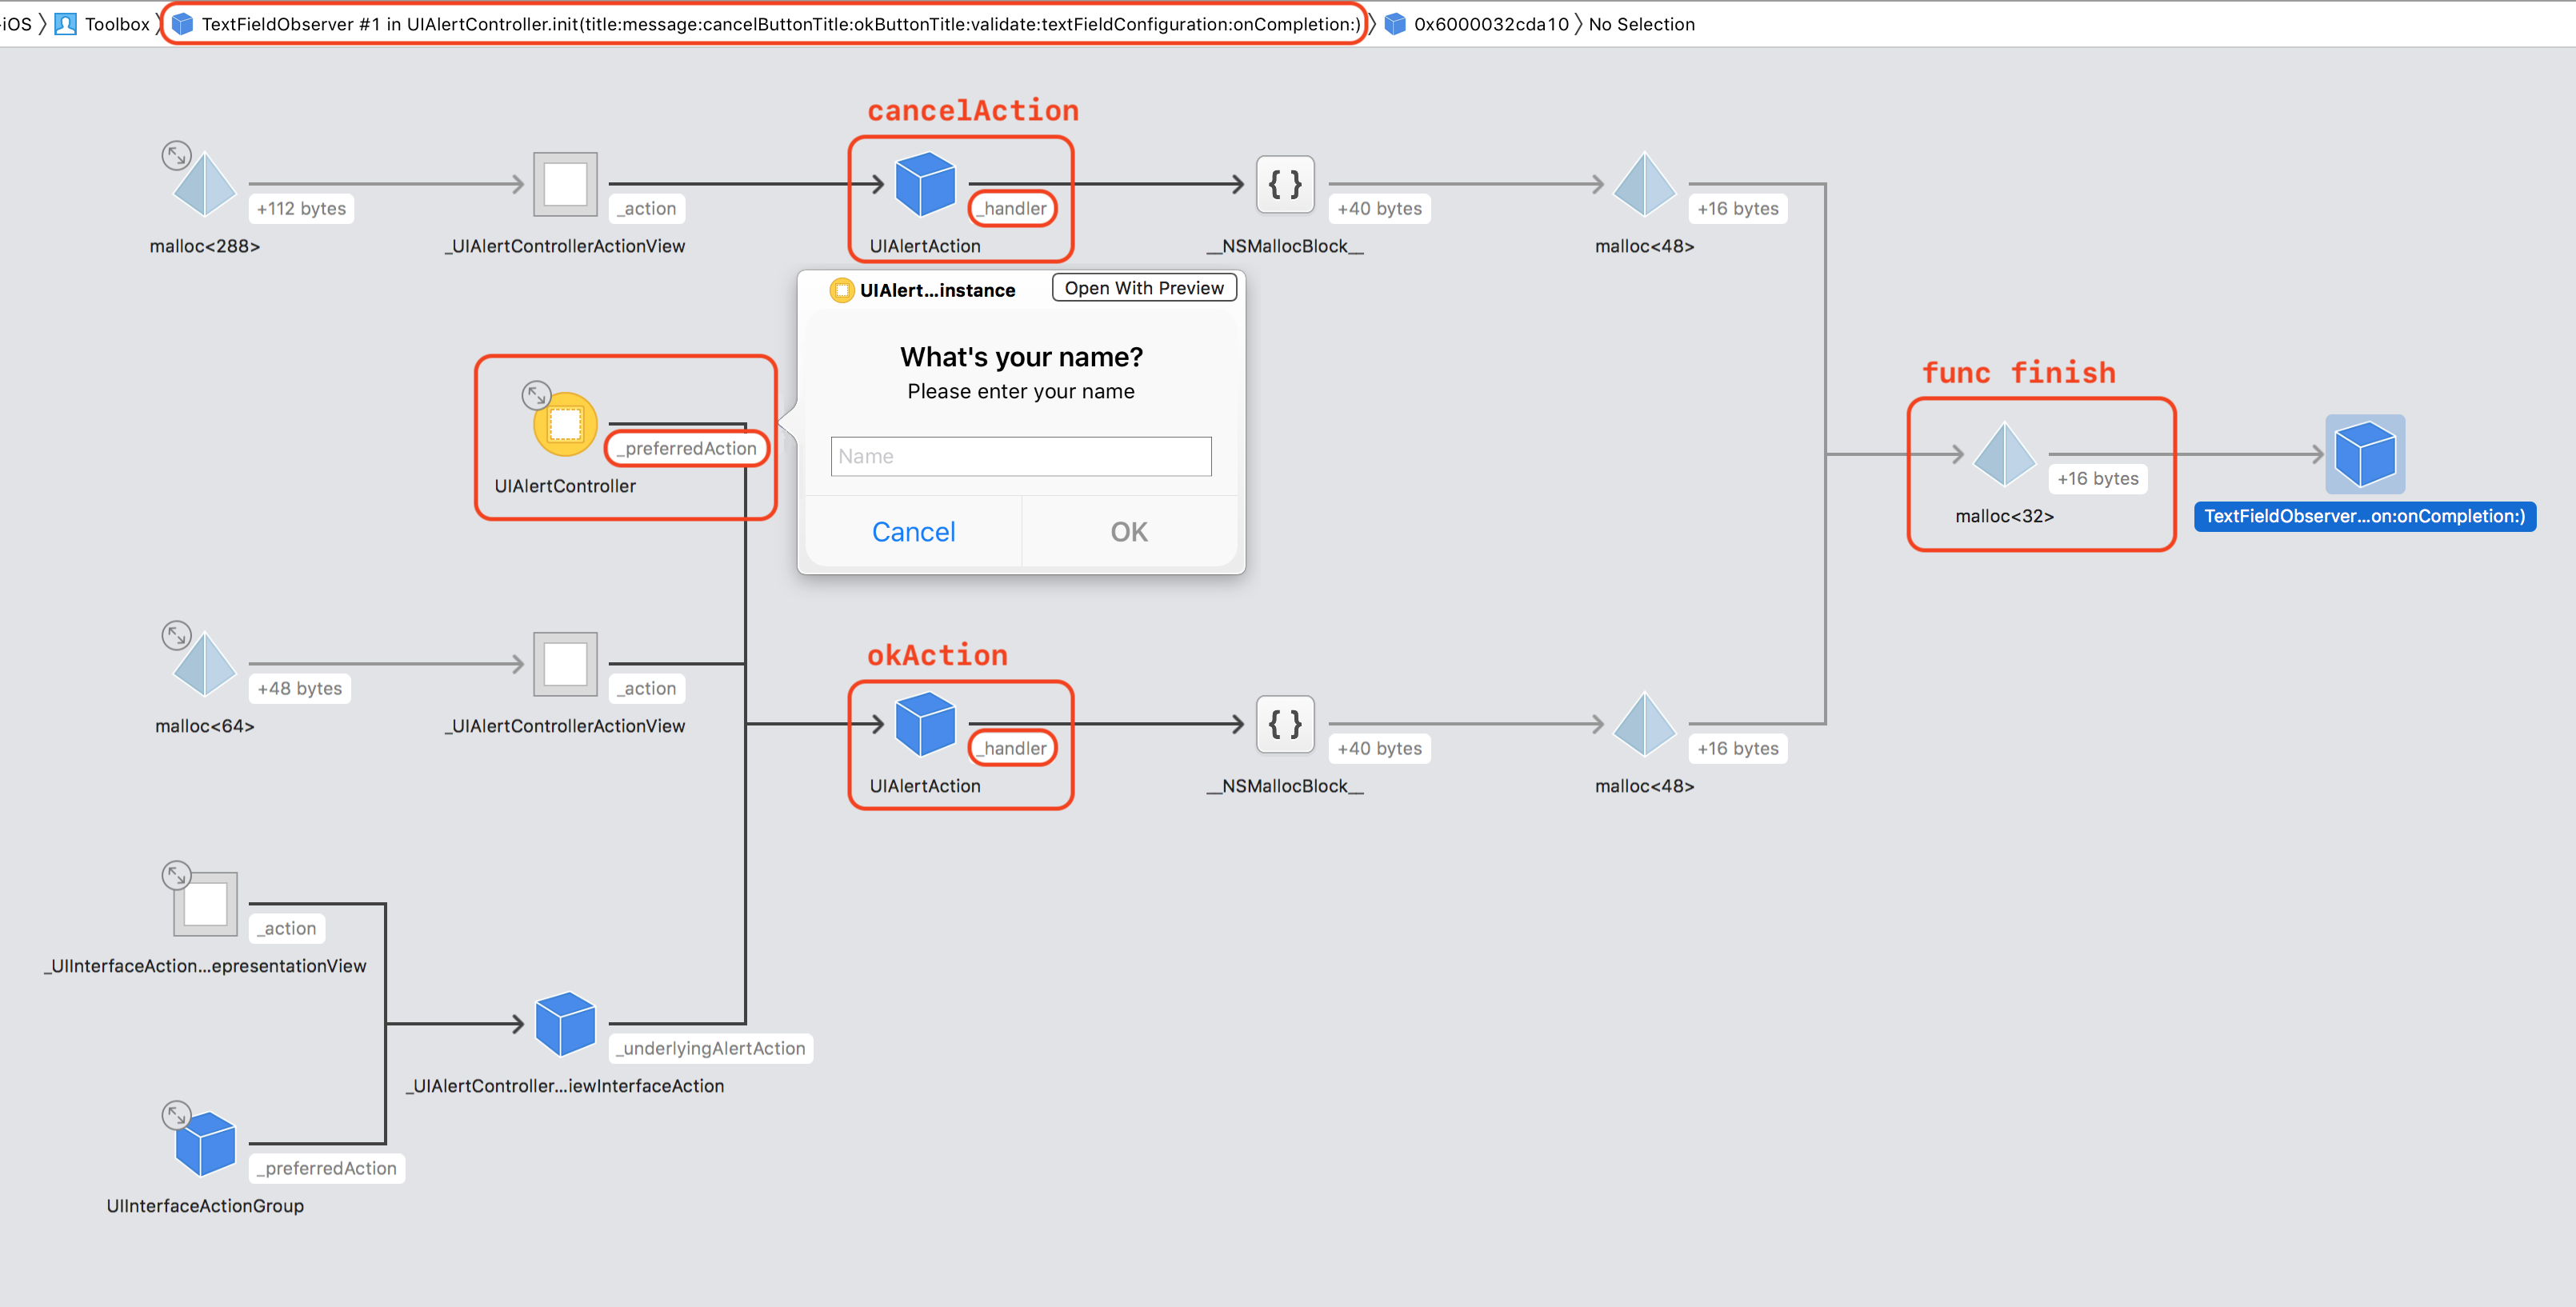
We can see this in action by inspecting my demo app in Xcode’s memory graph debugger while an alert is on screen:

TextFieldObserver. In the middle are the UIAlertController and its two UIAlertActions (Cancel and OK).
The rightmost object is the TextFieldObserver instance we want to keep alive. You can see the UIAlertController in the middle, and the two UIAlertActions we added to the alert. The Cancel button’s action is on top and the OK button’s on the bottom — you can see that it’s connected to the alert controller’s _preferredAction ivar.
Both action objects have a _handler ivar that stores their respective completion blocks. Each of these handlers keeps a strong reference to our local finish function because their bodies call it. And since func finish has captured our local textFieldObserver, this completes the reference chain.
Closures and objects are equivalent
This notion that a closure — i.e. a function that can capture mutable state — can assume the place where you’d normally need an object is a very deep idea. In Swift, closures and objects aren’t interchangeable, of course, but most of the differences in functionality between the two are more or less artificial, not mandatory. For example, function types can’t conform to protocols, but conceptually they could if somebody wrote the code for the compiler to support this.
Another way to see the similarities is to look at how objects and functions are stored in memory. A closure consists of a context — a collection of its captured variables — and a pointer to the function’s implementation. Likewise, an object has storage for its instance variables and a pointer to a function table to find the implementations for its methods.
If you wrap all methods an object understands in a single big dispatch function, you can think of an object as being equivalent to a function with a signature like this:
typealias Object = (Selector, Arguments) -> (Result)
That is, call this function with a selector (or message) and some arguments, and it will execute the method for the given selector/message and return a result. And if the Object function captures one or more variables, these make up the object’s “instance variables” or state.
I find this extremely fascinating.
If you want to learn more about this, you should follow Graham Lee, who has been writing about this stuff for years. Graham’s article Object-Oriented Programming in Functional Programming in Swift is a good starting point, as is his dotSwift 2018 talk on the same topic.
