When you create a new iOS app project in Xcode, you get to choose between several project templates, from the aptly named “Empty Application” to specialized things like an “OpenGL Game”. I noticed that beginners can feel overwhelmed by so much choice. Which starting point should I choose? What if I go with a “Single View Application” now but later decide that I really wanted a tab bar in my app? Do I have to start over?
This post is an attempt to answer questions like these and dispel any fears you might have about the choice of your project template. Once you have seen how small the differences between most of the templates are, you will realize that it doesn’t matter much which one you chose as your starting point as you can easily incorporate another template’s features into your existing app.

The information in this post is based on Xcode 4.6.2, the latest available version of Xcode at the time of writing. Apple may very well change some aspects of the project templates in the future, though I expect the essential parts to remain largely constant for the foreseeable future.
Empty Application
Let’s begin with the simplest template, an “Empty Application”. On the next page of the New Project dialog panel, you can give your app a name and get to set a few options, which I’ll discuss later. For now, select iPhone as your target device and make sure the box for “Use Automatic Reference Counting” is checked. Leave the other options (“Use Core Data” and “Include Unit Tests”) unchecked.

As the name suggests, the Empty Application template includes just enough boilerplate to get you started with a valid iOS app. The file main.m contains the main() function, which is the starting point for every C and, by extension, Objective-C program. The sole task of main() is to get the Cocoa event handling system started and pass control to it. See my earlier post on the iOS application launch sequence for a detailed look at how it does this. The main() function is identical in each project template.
int main(int argc, char *argv[])
{
    @autoreleasepool {
        return UIApplicationMain(argc, argv, nil,
            NSStringFromClass([AppDelegate class]));
    }
}
Even the simplest iOS application needs a main window. In the Empty Application template, the window is created and brought on screen in the application:didFinishLaunchingWithOptions: method in the AppDelegate class.
- (BOOL)application:(UIApplication *)application
    didFinishLaunchingWithOptions:(NSDictionary *)launchOptions
{
    self.window = [[UIWindow alloc]
        initWithFrame:[[UIScreen mainScreen] bounds]];
    // Override point for customization after application launch.
    self.window.backgroundColor = [UIColor whiteColor];
    [self.window makeKeyAndVisible];
    return YES;
}
That is all the relevant code in this template. The AppDelegate includes a few other empty method bodies to get you started with your app’s lifecycle management. The comments in these methods are quite helpful in understanding the purpose of each method.
Note that this template does not contain any storyboards or NIB files. It does not even create a view controller, despite the central role view controllers play in UIKit.1 While you could theoretically proceed by creating your app’s views and controls right here in the app delegate and adding them directly to the window, that is not a good idea.
Single View Application
The next project template we’ll look at is the Single View Application. Its central difference compared to the Empty Application template is that this one includes a custom view controller, which is properly installed as the main window’s root view controller. When creating an app from this template, you also get the choice whether you want to “Use Storyboards” or not. Let’s go with storyboards first.
With Storyboards
The Single View Application comes with three new files: the app’s storyboard in MainStoryboard.storyboard and a header and implementation file for the view controller class, inheriting from UIViewController. The storyboard contains a single scene representing the view controller and its empty view.
Pay attention to the implementation of the app delegate. Contrary to the Empty Application, the application:didFinishLaunchingWithOptions: method contains no significant code at all:
- (BOOL)application:(UIApplication *)application
    didFinishLaunchingWithOptions:(NSDictionary *)launchOptions
{
    // Override point for customization after application launch.
    return YES;
}
Where does our app’s main window come from then? It turns out that, by specifying a storyboard in the app’s Info.plist file (under the UIMainStoryboard key), the UIApplication object automatically creates a window and assigns it to our app delegate’s window property.2 The UIApplication instance also loads the storyboard, initializes the storyboard’s initial view controller and installs it as the window’s rootViewController.
This way, control reaches your root view controller’s viewDidLoad method (where you usually place code to configure your app’s initial view) without a single line of code. We will see this pattern in all other templates that use storyboards, as well.
Without Storyboards
If you opt not to use a storyboard when you create your app, Xcode will set you up with traditional NIB/XIB files instead. In the case of a Single View Application, you will get one .xib file that contains the view of your root view controller. Note that the file MainWindow.xib that used to be present in older project templates is no longer there. Your app’s main window is created in code, just like we saw in the Empty Application template. In addition, the view controller is created and assigned to the window:
- (BOOL)application:(UIApplication *)application
    didFinishLaunchingWithOptions:(NSDictionary *)launchOptions
{
    self.window = [[UIWindow alloc]
        initWithFrame:[[UIScreen mainScreen] bounds]];
    // Override point for customization after application launch.
    self.viewController = [[ViewController alloc]
        initWithNibName:@"ViewController" bundle:nil];
    self.window.rootViewController = self.viewController;
    [self.window makeKeyAndVisible];
    return YES;
}
This also illustrates what changes you would have to make if you wanted to convert an existing app’s root view controller into one that is loaded from a storyboard: first, create the storyboard file and set up the root view controller scene inside. Then add the UIMainStoryboardFile key to your Info.plist (removing the NSMainNibFile key at the same time if present) and remove the now unnecessary code from application:didFinishLaunchingWithOptions:.
Utility Application
The Utility Application template includes two view controllers. The root view controller (MainViewController) is set up exactly like the Single View Application. It contains a button that lets the user switch to another view controller (presented modally) and back. When using storyboards, the transition to the FlipsideViewController is modeled with a modal segue inside the storyboard.
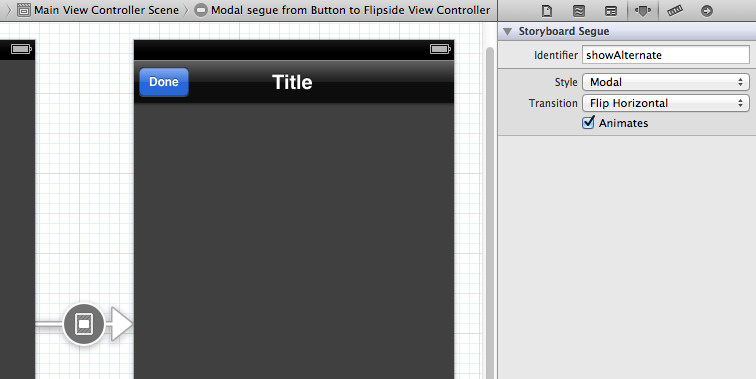
FlipsideViewController in an Xcode Utility Application project template.
In the “no storyboard” case, the segue is replaced by a manual call to presentViewController:animated:completion: but is otherwise very similar.
Both variants use the same technique for returning from the flipside view controller back to the main view: the main view controller assigns itself as the flipside view controller’s delegate, and the flipside view controller used a custom delegate protocol to inform its delegate when it is time to flip back to the main view. This is a very common design pattern in Cocoa apps and the Utility Application template is a good way to see how you would implement it for your custom view controllers.
Note that Apple chose not to use an unwind segue to get back to the main view in the variant with storyboards, possibly because that would have made the template incompatible with iOS 5.
Tabbed Application
The Tabbed Application template sets up an app with a tab bar controller displaying two tabs, each represented by another content view controller. The setup of this app is trivial and just as straightforward as a Single View Application. With storyboards, the entire thing is set up inside the storyboard without a single line of code: a UITabBarController acts as the storyboards initial view controller and is connected via relationship segues to its two content view controllers.
Without storyboards, the creation of the tab bar controller and the two content view controllers takes place in code but is just as simple:
- (BOOL)application:(UIApplication *)application
    didFinishLaunchingWithOptions:(NSDictionary *)launchOptions
{
    self.window = [[UIWindow alloc]
        initWithFrame:[[UIScreen mainScreen] bounds]];
    // Override point for customization after application launch.
    UIViewController *viewController1 = [[FirstViewController alloc]
        initWithNibName:@"FirstViewController" bundle:nil];
    UIViewController *viewController2 = [[SecondViewController alloc]
        initWithNibName:@"SecondViewController" bundle:nil];
    self.tabBarController = [[UITabBarController alloc] init];
    self.tabBarController.viewControllers = @[viewController1, viewController2];
    self.window.rootViewController = self.tabBarController;
    [self.window makeKeyAndVisible];
    return YES;
}
If you have never worked with a tab bar controller before, you might be surprised to see that the captions and images on the tab bar are actually properties of the respective content view controllers and not of the tab bar itself, but it makes sense from an encapsulation perspective: each view controller should know itself how it wants to represented in a tab bar.
Master-Detail Application
The Master-Detail Application template is interesting for a number of reasons. Firstly, it is the only template that differs significantly depending on the device family (iPhone or iPad) you choose to target. Secondly, the content view controllers actually do include some meaningful degree of functionality and are not just empty placeholders.
iPhone vs. iPad vs. Universal
The iPhone version of this template starts out with a UINavigationController as the root view controller. The navigation controller contains a table view controller (the master view), and tapping on a row in the table transitions to a second view controller (the detail view). The app template for the iPad begins with a UISplitViewController, which in turn contains the master table view on the left and the detail view on the right. If you choose to create a Universal app (targeting both iPhone and iPad), it will contain both variants in separate storyboards. In all cases, the setup of the view controllers is again quite simple and should be familiar by now.
This app template is a good reference on how to set up a Universal application (or two separate apps for iPhone and iPad) from a single codebase, despite seemingly big platform-dependent differences in the app’s user interface. It is important to note how much code can be shared between both targets and how little code is device-family-dependent. For instance, the two content view controllers can be largely ignorant of the specific device they run on.
Content View Controllers
The MasterViewController class (inheriting from UITableViewController) implements a fully functional table view controller that manages an array of simple data objects (instances of NSDate, in this case) and acts as the data source for its table view. If you have never worked with table views before, this is a good starting place for your first experiments. Once you are familiar with UITableView, it is trivial to recreate an interface like this from scratch.
With Core Data
With the “Use Core Data” option checked, the timestamp objects this template uses even get inserted into the data store and are properly saved. The interplay between data store and table view is not done manually but handled by an NSFetchedResultsController, making this option worse if your goal is to learn how UITableView works. Access to the Core Data stack is not very well encapsulated (see below for more on the “Use Core Data” option).
Page-Based Application
This is a relatively new template. It showcases the UIPageViewController class that Apple introduced in iOS 5.0. Because this template was never available in the time before storyboards, you don’t even get the option whether you want to use them or not – which is ironic since page view controllers are data-source-based and cannot even be set up entirely within a storyboard file like the other container view controllers.
It is important to understand the structure of a page-based app: the RootViewController is a custom UIViewController subclass that acts as a container view controller for a UIPageViewController. The page view controller, in turn, asks its datasource to create and return the view controller(s) whose views it then displays as its pages. In our case, each page is represented by an instance of DataViewController. You will find the setup code in -[RootViewController viewDidLoad]:
- (void)viewDidLoad
{
    [super viewDidLoad];
    // Do any additional setup after loading the view, typically from a nib.
    // Configure the page view controller and add it as a child view controller.
    self.pageViewController = [[UIPageViewController alloc]
        initWithTransitionStyle:UIPageViewControllerTransitionStylePageCurl
        navigationOrientation:UIPageViewControllerNavigationOrientationHorizontal
        options:nil];
    self.pageViewController.delegate = self;

    DataViewController *startingViewController =
        [self.modelController viewControllerAtIndex:0
        storyboard:self.storyboard];
    NSArray *viewControllers = @[startingViewController];
    [self.pageViewController setViewControllers:viewControllers
        direction:UIPageViewControllerNavigationDirectionForward
        animated:NO completion:NULL];

    self.pageViewController.dataSource = self.modelController;

    [self addChildViewController:self.pageViewController];
    [self.view addSubview:self.pageViewController.view];

    // Set the page view controller's bounds using an inset rect so that
    // self's view is visible around the edges of the pages.
    CGRect pageViewRect = self.view.bounds;
    self.pageViewController.view.frame = pageViewRect;

    [self.pageViewController didMoveToParentViewController:self];

    // Add the page view controller's gesture recognizers to the book view
    // controller's view so that the gestures are started more easily.
    self.view.gestureRecognizers = self.pageViewController.gestureRecognizers;
}
Better Code Practices
Since this is a more modern template, it also contains better code practices than some of the others. For instance, Apple has created a separate ModelController class (inheriting from NSObject, not to be confused with a view controller) that acts as the page view controller’s data source rather than putting that code directly into the root view controller. Try to do the same in your own apps and not stuff everything into your view controllers.
The DataViewController is included in the storyboard, even though it is not connected to the root view controller via segues. Every time the page view controller asks its data source for a new page, the ModelController tells the storyboard to instantiate a new DataViewController instance and returns it.
OpenGL Game
The OpenGL Game template is the odd one out. It too uses UIKit like the other app templates, but only to set up an OpenGL ES 2.0 stack and give you a starting point for writing OpenGL code. It has been updated fairly recently and takes full advantage of the GLKit framework introduced in iOS 5.0.
When you create an OpenGL-based app, you will notice two new files in the project: Shader.vsh and Shader.fsh, a basic vertex and fragment shader. You will also notice that your app’s view controller inherits from GLKViewController and its view is a GLKView.
The view controller contains almost 400 lines of code for setting up the OpenGL ES 2.0 stack3 and for a small sample scene. Surprisingly (and unlike the other templates), it even includes a useful implementation for the didReceiveMemoryWarning method.
If you want to write an OpenGL-based app, this template is a very good starting point. Setting up the OpenGL stack takes a lot of code that is not particularly well documented in one place anywhere else, and since the setup is platform-dependent, even OpenGL experts will benefit from using the template.
Project Creation Options
Finally, let’s take a look at some of the options Xcode offers for the project templates. As you already know, not every option is available for every template, and some of them I have already discussed above. Here is what I have to say about the others.
Targeted Device Family: iPhone vs. iPad vs. Universal
With the exception of the Master-Detail Application template, choosing between iPhone and iPad does not affect the projects in any substantial way. Storyboards and NIB files are generated in the appropriate size for the targeted device. For universal apps, Xcode creates separate storyboard or NIB files per target platform. The generated code is mostly identical with very few exceptions, like this example:
- (void)awakeFromNib
{
    if ([[UIDevice currentDevice] userInterfaceIdiom] == UIUserInterfaceIdiomPad)
    {
        self.clearsSelectionOnViewWillAppear = NO;
        self.contentSizeForViewInPopover = CGSizeMake(320.0, 600.0);
    }
    [super awakeFromNib];
}
Use Automatic Reference Counting
I cannot imagine a reason why you should not enable ARC for new projects, other than wanting to learn about manual retain and release. Automatic Reference Counting makes your life as a Cocoa developer much easier.
Use Core Data
The Core Data option is only available for an Empty Application, a Utility Application or a Master-Detail Application. Enabling it tells Xcode to create an empty .xcdatamodeld file for designing your app’s data model. You can easily create it manually if you decide to incorporate Core Data at a later time, though.
In addition, Xcode creates a bunch of code (about 100 lines) in your app delegate for setting up and accessing your Core Data stack, which mainly consists of three objects: a managedObjectContext, a mangedObjectModel and a persistentStoreCoordinator. Reading this code is certainly instructive (the comments contain lots of good information) and writing it from scratch can be difficult if you have never worked with Core Data before. However, there are so many deficiencies in Apple’s code that I only recommend it as a starting point. You should rewrite it significantly for your own needs.
Problems with Apple’s sample code include:
-
Error handling is missing (though this is clearly documented in the comments).
-
The
-saveContextmethod is called fromapplicationWillTerminate:although it is clearly documented that this method is never called in the application lifecycle on modern multitasking-capable iOS devices. The correct place for saving isapplicationDidEnterBackground:, which lacks a call tosaveContext. This suggests that Apple has not touched this part of the sample code for years.4 -
The app delegate is arguably not the right place for managing your Core Data stack. You should create a separate class for it.
-
The sample code creates the app’s data store file in the application documents directory, which is arguably not the right place for it. In most cases, the Library directory is probably a better choice because it does not give users access to the file (e.g. via iTunes file sharing).
-
The code doesn’t use Core Data’s new concurrency model, with separate managed objects contexts for the main queue and a background queue, even though Apple recommends to use it.
Include Unit Tests
Checking this option tells Xcode to create a separate build target for running your unit tests. It is a good idea to set this up from the start as it does not interfere with the rest of your app in any way if you don’t use it. If you want to create a unit test target for an existing app at a later time, Apple provides a step-by-step guide. Make sure to set up a target for what Apple calls “Application Tests” (as opposed to “Logic Tests”).
Conclusion
Apple’s iOS app project templates are good starting points if you want to learn how certain standard app patterns are architected. It is essential to understand that the available project templates do not vary much from each other (with the exception of the OpenGL template). It does not really matter from which template you start your project as you can easily switch to (or incorporate) another at any time.
Also remember that – like all of Apple’s sample code – the app templates do not necessarily represent best practices and some parts of them have not been updated in years. Use them for getting ideas but don’t be afraid to do stuff differently. And right after creating a new app, enable more compiler warnings.
Personally, I start nearly all my projects from the Single View Application template and build from there.
-
For instance, apps that do not use view controllers will not handle device rotation very elegantly. When you start an empty app, Apple even reminds you with a message in the debugger console how important a root view controller is:
Application windows are expected to have a root view controller at the end of application launch
. ↩︎ -
Note that the app delegate must have a mandatory
windowproperty (it cannot be named differently) for this to work. Thewindowproperty has become part of theUIApplicationDelegateprotocol with the introduction of storyboards in iOS 5.0.Implementation of this property is required if your app’s
↩︎Info.plistfile contains theUIMainStoryboardFilekey. -
Apple does not offer an option for setting up an Open GL ES 1.1 stack anymore. All devices that are compatible with iOS 5 and up have OpenGL ES 2.0 support. ↩︎
-
Possibly because Apple itself does not even have good internal tools for creating and maintaining Xcode project templates. Creating a project template manually involves a lot of steps and ugly plist entries. If Apple engineers have to do this by hand, I can understand why they neglect to update them regularly. ↩︎