Compiler warnings are one of the most helpful tools for developers. The compiler can not only warn you about obvious mistakes (such as a method you forgot to implement); it also identifies many code patterns that, though syntactically correct, are potentially dangerous (like signed/unsigned conversion) or just plain wrong (such as mismatched format specifiers in a format string).
Both the Clang compiler frontend and Apple’s default Xcode project templates have a default set of warnings enabled, designed to warn you about many probable errors in your code but not annoy you with tons of false positives. These default settings tend to be rather conservative regarding the warnings they enable in order to play well with large legacy codebases. They are not the best choice for new projects, though. Instead, you should strive to switch on as many warnings as possible.
Enable As Many Warnings As Possible
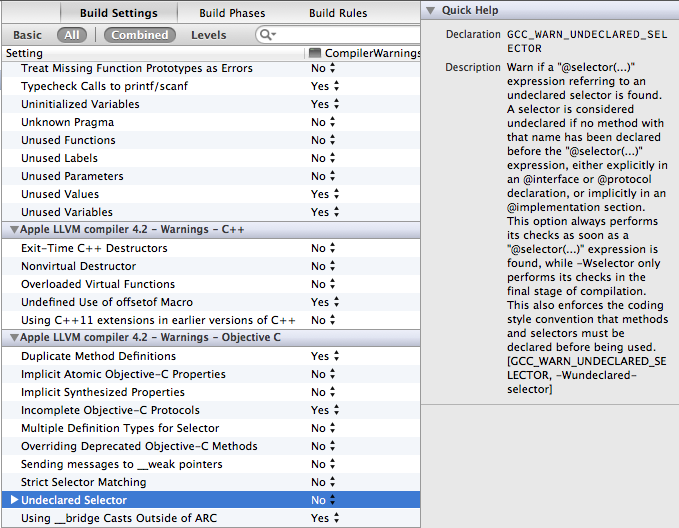
To make use of all the help you can get from the compiler, you must edit your project’s build settings and enable more warnings. Most warning types are exposed in Xcode’s Build Settings UI so you can enable additional ones one by one (either for your entire project or on a per-target basis). The Quick Help Inspector can help explain the purpose of each warning. The build settings UI has multiple sections for warnings, so make sure to look at all sections labeled “Apple LLVM compiler - Warnings – …”.
But there is an even better (and more future-proof) way: rather than switching on the warnings you want one by one, I think the better approach is to start with all (or almost all) warnings enabled and then to selectively disable the few types of warnings you actively choose to ignore. That way, you can be sure that even your existing projects will profit from better code analysis as the compiler gets smarter and smarter with each release and new warnings are added. For instance, Xcode 4.6 (using LLVM 3.2) gained several new warnings.1
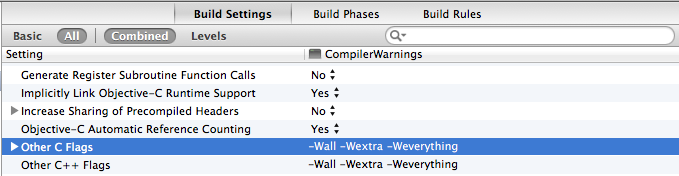
The downside (is it really a downside?) is that you can’t enable such a setup with a few mouse clicks. Instead, you have to add one or more custom build flags to the Other C FlagsOther Warning Flags build setting (putting them in Other C Flags works but Other Warning Flags is the more appropriate place). The compiler flag -W… lets you to enable or disable specific warnings as well as predefined sets. You can include as many -W… options as you like. For example, the flags -Wall -Wno-unused-variable tell the compiler, “enable ‘all’ warnings (see below for the meaning of ‘all’) but don’t warn me about unused variables”.
Update December 13, 2013: Reader Michael Hackett pointed out to that even if you include custom warning flags in your build settings, Xcode will still observe the checked/unchecked warnings and add the corresponding Clang flags to its build commands. However, a custom warning flag like -Wall -Wextra will be added at a later position in the build command and thus seems to override the other flags. It’s not pretty but it works.
All != Everything
Okay, so you have decided to start with the full set of warnings enabled. What’s the correct -W… incantation? The answer to this question is more complicated than you might think. Chandler Carruth, one of the LLVM developers, explains this in an outstanding answer on Programmers Stack Exchange. There are several important warning flag groupings in Clang:
-
-Wall: This sounds like a set of all warnings, but it actually only covers a subset of the available warnings. In Carruth’s words, the compiler developershave high confidence in both value and a low false-positive rate
of these warnings. This flag will provide you with quite an aggressive warning level that will probably point out a bunch of potential errors in your code that the default settings did not catch. At the same time,-Wallis desiged to issue very few false positives even in legacy codebases, which is why some crucial warnings are missing from this grouping. -
-Wextra: This grouping includes warnings that can be equally useful as those in-Wall, but may trigger a higher false-positive rateor common philosophical objections
. A good example of this is the-Wsign-compareflag, which warns you when you compare a signed integer to an unsigned type. Since many large codebases do this all over the place (and it isn’t a bug in most cases), including the flag in-Wallwould generate tons of warnings you probably don’t want to see.Note that
-Wextradoes not include-Wall. If you want both, you have to specify both in your Other C Flags. Unlike-Wall, which is a mostly stable grouping (partly for historical reasons), as new useful warnings get added to Clang, they are included in-Wextra. -
-Weverything: This is the magic incantation that actually enables every warning in Clang, including those that may still be in development and contain bugs.Don’t use this on your code. It is intended strictly for Clang developers or for exploring what warnings exist.
Which Warnings Should I Enable?
I recommend you start with -Wall and -Wextra, especially for fresh projects. Then proceed from there. Build your project and see what warnings pop up. Fix the ones that expose actual problems in your code.
If you encounter a particular warning that you actively want to suppress, check the build log. The compiler will tell you the name of each warning it has issued (-Wunused-variable in this example). You can use this name to selectively disable (with -Wno-unused-variable) or enable this specific warning in your project. In my experience, you will come up with a very short list of warnings you want to disable (probably no more than a handful).

Disable a Warning Temporarily
You should always strive for a project that builds with zero warnings. A code base that leaves compiler warnings unfixed is a sign of carelessness on the part of the developer.
If you only want to disable a warning in one or more specific files of your target (for example because you are using the source code from a third-party library and you don’t want to fix the warnings in that code), you can also include -W… flags on a per-file basis. Just switch to the Build Phases tab and in the Compile Sources section, add the options to the Compiler Flags field for the files in question.
To disable a warning for a small code section but not for the entire file, Clang supports the following #pragma statements:
#pragma clang diagnostic push
#pragma clang diagnostic ignored "-Wsign-compare"

int i = 100;
unsigned int u = 200;
if (i < u) {  // no warning
  ...
}

#pragma clang diagnostic pop
Treating Warnings as Errors
Many developers prefer to instruct the compiler to treat warnings as errors as it prohibits a successful build if even a single warning remains unaddressed. To do this, in Xcode, check the corresponding check box in the build settings or include -Werror in your Other C Flags.
Personally, I don’t use this setting because I find it sucks during development. Warnings like “unused variable” that are perfectly fine during debugging cause more work than they should if you treat them as errors. That does not mean, however, that I tolerate unaddressed warnings in “real” builds. Activating -Werror only for release builds and on your continuous integration server (if you have one) is a good compromise.
Note that there is also -Werror=foo (lets you only treat specific warnings as errors) and -Wno-error=foo (treats specific warnings as simple warnings instead of errors if -Werror is enabled) for even more fine-grained control.
-
Xcode 4 has a migration assistant that can automatically update your legacy project’s build settings to include the new default warnings. It pops up automatically as a build warning when you try to build a project with legacy settings in a new Xcode version. This is helpful but no guarantee that you will catch all new capabilities of the new compiler version. The assistant will only update your project to Apple’s recommended settings, which may or may not suit your project (and Xcode’s build settings UI does not even expose all available compiler warnings). ↩︎